

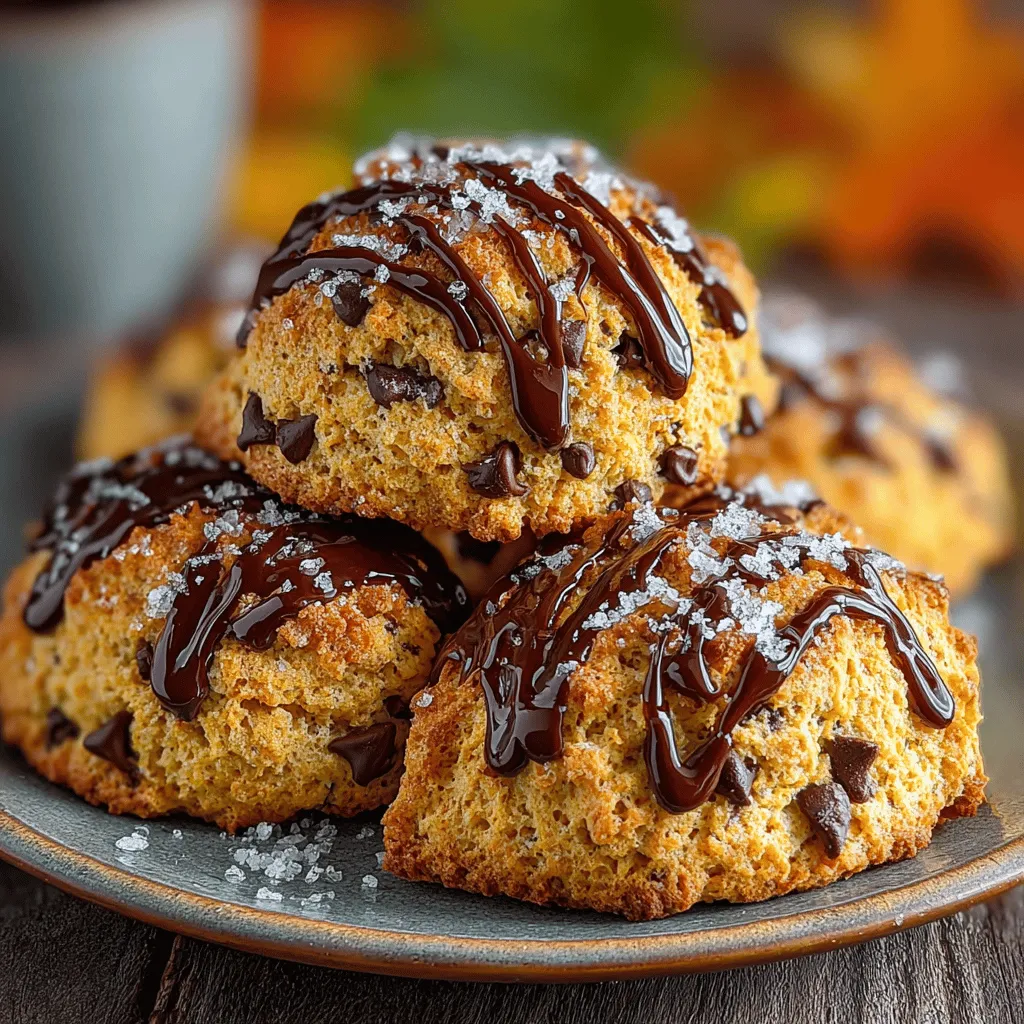
As the leaves turn golden and the air becomes crisp, there’s a unique charm to autumn that invites us to indulge in cozy flavors. Among these, pumpkin and chocolate stand out as a dynamic duo that perfectly encapsulates the season. This Autumn Bliss Pumpkin Chocolate Chip Scones recipe combines the warm, inviting taste of pumpkin with the rich sweetness of chocolate chips, making it an ideal choice for cozy gatherings or a comforting treat at home. Whether enjoyed with your morning coffee, as a delightful snack, or as a sweet dessert, these scones offer versatility that suits any occasion.
Ingredients
– 2 cups all-purpose flour
– 1/4 cup granulated sugar
– 1 tablespoon baking powder
– 1/2 teaspoon baking soda
– 1/2 teaspoon salt
– 1 teaspoon ground cinnamon
– 1/2 teaspoon ground nutmeg
– 1/4 teaspoon ground ginger
– 1/2 cup cold unsalted butter, cubed
– 1/2 cup canned pumpkin puree (not pumpkin pie filling)
– 1/4 cup heavy cream
– 1 large egg
– 1 teaspoon vanilla extract
– 1 cup semi-sweet chocolate chips
Instructions
1. Preheat your oven to 400°F (200°C) and line a baking sheet with parchment paper.
2. In a large mixing bowl, whisk together the flour, sugar, baking powder, baking soda, salt, cinnamon, nutmeg, and ginger until well combined.
3. Add the cold cubed butter to the flour mixture. Using a pastry cutter or your fingertips, cut the butter into the flour until the mixture resembles coarse crumbs.
4. In a separate bowl, mix together the pumpkin puree, heavy cream, egg, and vanilla extract until smooth.
5. Pour the pumpkin mixture into the flour mixture and gently fold until just combined. Avoid over-mixing; the dough should be slightly sticky.
6. Fold in the chocolate chips until evenly distributed throughout the dough.
7. Turn the dough out onto a lightly floured surface and gently knead it a few times to bring it together. Pat the dough into a circle about 1 inch thick.
8. Cut the circle into 8 wedges and place them on the prepared baking sheet, spacing them about 2 inches apart.
9. Bake for 15-20 minutes or until the scones are golden brown and a toothpick inserted into the center comes out clean.
10. Allow the scones to cool on the baking sheet for 5 minutes before transferring them to a wire rack to cool completely.
Understanding the Ingredients
In this delightful recipe, each ingredient plays a crucial role in creating the perfect scone. Using canned pumpkin puree instead of pumpkin pie filling is essential, as it ensures that the scones are moist without the added sugar and spices that can come with pie filling. The warm spices of cinnamon, nutmeg, and ginger not only enhance the flavor but also evoke the quintessential essence of autumn.
Preparing for Baking
Before diving into the baking process, it’s important to prepare your kitchen. Preheating the oven to the correct temperature ensures that the scones bake evenly, resulting in the perfect texture. Additionally, lining your baking sheet with parchment paper will facilitate easy cleanup and promote even baking, preventing the scones from sticking.
Mixing the Dry Ingredients
Start by thoroughly mixing the dry ingredients. Each component, from flour to baking powder, contributes to the structure and rise of the scone. Proper mixing is crucial to avoid lumps, which can affect the texture of the final product.
Incorporating the Butter
The next step involves cutting in the cold butter. This technique is vital for achieving a flaky texture, as it creates pockets of fat within the dough. Look for a consistency where the mixture resembles coarse crumbs, with small pieces of butter still visible, which will melt during baking to form a light and airy scone.
Creating the Pumpkin Mixture
Once the dry ingredients and butter are prepared, it’s time to create the pumpkin mixture. Combining the wet ingredients carefully ensures a smooth blend, which is key to achieving an even distribution of flavors throughout the scone dough.
Bringing It All Together
After mixing the wet and dry ingredients, gentle handling is crucial to maintain the scone’s light texture. By avoiding over-mixing, you ensure that the scones remain tender and fluffy, ready to deliver a delightful burst of pumpkin and chocolate in every bite.
Combining Wet and Dry Ingredients
When it comes to making light and fluffy scones, the way you combine wet and dry ingredients is crucial. Begin by mixing your dry ingredients thoroughly to ensure even distribution of baking powder, spices, and salt. In a separate bowl, whisk together your wet ingredients, including the pumpkin puree and any liquid components. Pour the wet mixture into the dry ingredients and gently fold them together using a spatula or wooden spoon.
Tips for Avoiding Overmixing
To retain the scones’ lightness, mix just until the dry ingredients are moistened. A few lumps in the batter are perfectly fine. Overmixing develops gluten, which can result in dense scones rather than the desired tender texture. Remember, the goal is to combine, not to create a uniform batter.
The Role of Chocolate Chips
Chocolate chips play a pivotal role in these scones, providing a delightful surprise in every bite. Use high-quality dark chocolate chips for a richer flavor that complements the pumpkin’s natural sweetness. The melting chocolate creates a luxurious texture, enhancing the overall experience of the scone.
Shaping the Scones
Kneading and Shaping Techniques
Once your dough is ready, transfer it to a lightly floured surface. Gently knead the dough just a few times to bring it together. Avoid vigorous kneading, as this can lead to tough scones. Shape the dough into a circle or rectangle, depending on your preference for scone design.
Achieving the Right Thickness
Aim for a thickness of about 1 inch. This thickness allows for even baking and ensures the insides are cooked through without the outsides becoming overly browned. Use a rolling pin if necessary, but remember to handle the dough gently.
Cutting and Preparing for Baking
Best Practices for Slicing
For cutting the dough into wedges, use a sharp knife or a bench scraper. Cut the dough into 8 equal triangles, ensuring each cut is clean. This helps maintain the shape of the scone as it bakes.
Spacing on the Baking Sheet
When placing the scones on a baking sheet, ensure there is ample space between each piece. This spacing allows for proper expansion during baking, preventing the scones from merging into one another.
Optional Finishing Touches
A simple brush of milk or a beaten egg wash on top of the scones before baking can give them a beautiful golden finish. If you’re looking for alternatives, consider using melted butter or a dairy-free option to achieve a similar effect. These finishing touches not only enhance appearance but also add a layer of flavor.
Baking the Scones
Ideal Baking Time
Bake your scones in a preheated oven at 400°F (200°C) for about 15-20 minutes. Keep an eye on them towards the end of the baking time. The scones should be golden brown on top and firm to the touch.
Toothpick Test for Doneness
To ensure that the scones are fully baked, perform the toothpick test. Insert a toothpick into the center of a scone; if it comes out clean or with a few moist crumbs, your scones are done. If it’s wet with batter, they need more time in the oven.
Cooling and Serving Suggestions
Once out of the oven, allow the scones to cool on a wire rack for about 10 minutes. This cooling time is essential as it helps set the texture.
Ideas for Serving
These scones are best enjoyed warm. Consider serving them with a spread of butter, a drizzle of maple syrup, or a dollop of whipped cream. Pair them with a steaming cup of tea or coffee for a cozy autumn treat.
Nutritional Information and Benefits
Pumpkin is an excellent source of fiber, vitamins A and C, and antioxidants, making these scones not only delicious but nutritious. Dark chocolate also provides health benefits, including antioxidants and minerals. Enjoying these scones as part of a balanced diet can be a delightful way to incorporate the flavors of autumn into your meals.
Conclusion
Making Autumn Bliss Pumpkin Chocolate Chip Scones is not only a rewarding baking project but also a way to celebrate the joys of the season. Embrace seasonal baking and share these delightful treats with family and friends. These scones embody the warmth and comfort of autumn, inviting everyone to gather around the table and enjoy the flavors of fall. Bake, share, and relish in the delightful experience of creating something special.