Introduction to Frozen Chocolate Banana Sandwich Coins
The delightful combination of chocolate and banana is a classic pairing that has captivated dessert lovers for generations. These two ingredients, when combined with a creamy nut butter and frozen into bite-sized snacks, create an indulgent treat that is both satisfying and guilt-free. In this article, we will dive into the delectable recipe for Frozen Chocolate Banana Sandwich Coins, a dessert that beautifully balances simplicity with rich flavor.
These frozen treats are not just about taste; they also offer a healthier alternative to many traditional sweets. Packed with nutrients and made from wholesome ingredients, they are an excellent option for both kids and adults. Whether you’re craving a quick snack or looking for a fun dessert to impress your guests, Frozen Chocolate Banana Sandwich Coins are sure to satisfy your sweet tooth while providing nutritional benefits.
Understanding the Ingredients for Frozen Chocolate Banana Sandwich Coins
To create the perfect Frozen Chocolate Banana Sandwich Coins, it’s essential to understand the key ingredients that contribute to their deliciousness and health benefits. This recipe primarily features ripe bananas, dark chocolate chips, coconut oil, and nut butter. Let’s explore each of these ingredients in detail.
Ripe Bananas
Ripe bananas form the base of this recipe, offering natural sweetness and a creamy texture that enhances the overall flavor profile. Bananas are not only delicious but also incredibly nutritious. They are an excellent source of potassium, which is vital for heart health and muscle function. Additionally, bananas provide dietary fiber, which aids digestion and contributes to a feeling of fullness. When selecting bananas for this recipe, look for those that are just ripe—slightly speckled with brown spots—indicating optimal sweetness and flavor.
Dark Chocolate
Dark chocolate is another star ingredient in this recipe, bringing a rich, indulgent flavor that pairs perfectly with bananas. Opting for dark chocolate over milk chocolate has its advantages; dark chocolate typically contains higher cocoa content, which means it’s packed with antioxidants and lower in sugar. These antioxidants can help combat oxidative stress in the body and may offer heart health benefits. When choosing dark chocolate chips, aim for a variety that contains at least 70% cocoa for maximum health benefits and a deeper chocolate flavor.
Nut Butters
Nut butters, whether peanut butter or almond butter, play a crucial role in elevating the flavor of the Frozen Chocolate Banana Sandwich Coins. Both types of nut butter offer a creamy texture and a dose of healthy fats, but they come with different flavor profiles and nutritional benefits. Peanut butter has a robust, nutty flavor and is typically more affordable, while almond butter is slightly sweeter and creamier, often preferred for its higher vitamin E content. When selecting a nut butter, make sure to choose a natural variety without added sugars or hydrogenated oils for the healthiest option.
Coconut Oil
Coconut oil is an important ingredient in this recipe, particularly for enhancing the texture of the dark chocolate coating. When melted, coconut oil helps create a smooth, glossy finish that adheres well to the bananas and nut butter. Additionally, coconut oil contains medium-chain triglycerides (MCTs), which are believed to provide a quick source of energy and may support weight management. Incorporating coconut oil into your chocolate mixture not only improves the texture but also contributes to the overall flavor, imparting a subtle tropical essence that complements the bananas beautifully.
Step-by-Step Preparation of Frozen Chocolate Banana Sandwich Coins
Now that we understand the essential ingredients, it’s time to delve into the preparation process. Making Frozen Chocolate Banana Sandwich Coins is straightforward, but paying attention to detail will ensure the best results. Here’s how to prepare these delightful treats step by step.
Preparing the Bananas
The first step in creating Frozen Chocolate Banana Sandwich Coins is to prepare the bananas. Begin by selecting ripe bananas, as previously mentioned, and peel them. Slice the bananas into uniform rounds, approximately half an inch thick. This uniformity is crucial for even freezing and ensures that each sandwich coin has a consistent texture. If the banana slices are too thin, they may become too mushy once frozen, while overly thick slices may not freeze evenly. Aim for a perfect balance that will provide a delightful bite when combined with the nut butter and chocolate.
Making the Peanut Butter Mixture
Next, it’s time to create the nut butter mixture. If you’re using peanut butter, you can simply scoop it out of the jar; however, if you’re opting for almond butter or any other variety, you may want to mix it with a touch of honey or maple syrup for added sweetness. The goal is to achieve a smooth and spreadable consistency. If the nut butter is too thick, consider gently warming it in the microwave for 10-15 seconds to make spreading easier. This step is particularly important for almond butter, which can sometimes be a bit firmer than peanut butter.
Assembling the Sandwiches
With the banana slices and nut butter mixture ready, it’s time to assemble the sandwiches. Take one banana slice and spread a generous layer of nut butter on top. Then, place another banana slice on top to create a sandwich. Repeat this process until you have assembled as many sandwich coins as you desire. To minimize mess, consider using a small spatula or the back of a spoon for spreading the nut butter evenly. This technique not only makes the process easier but also enhances the flavor integration between the banana and nut butter.
Freezing the Sandwiches
Once the banana sandwiches are assembled, it’s time to freeze them. Lay the banana sandwich coins on a parchment-lined baking sheet, ensuring that they are spaced apart to prevent sticking. This spacing is crucial because it allows for even freezing and easy removal later. Place the baking sheet in the freezer and allow the sandwiches to freeze for at least one to two hours or until they are firm.
In this part of the recipe, we’ve covered the introductory aspects of Frozen Chocolate Banana Sandwich Coins, including the key ingredients and initial preparation steps. In the next section, we will explore how to melt the chocolate, coat the sandwiches, and achieve the perfect frozen treat. Stay tuned for the continuation of this delicious journey!
{{image_2}}
Crafting the Chocolate Coating
Melting the Chocolate
Melting chocolate is a crucial step in creating your Frozen Chocolate Banana Sandwich Coins. The goal is to achieve a smooth, glossy chocolate coating that adheres perfectly to your banana sandwiches. One of the easiest methods to melt chocolate is using the microwave. Here’s how to do it effectively:
1. Choose Your Chocolate: Use high-quality chocolate chips or a chocolate bar. Dark chocolate is a fantastic choice for its rich flavor, but you can also use milk chocolate, white chocolate, or even dairy-free options for a vegan variety.
2. Chop the Chocolate: If you’re using a chocolate bar, chop it into small, even pieces. This helps the chocolate melt uniformly.
3. Microwave in Intervals: Place the chocolate in a microwave-safe bowl. Heat it on medium power for 30 seconds. After 30 seconds, stir the chocolate. Continue to heat in 15-second intervals, stirring after each, until it’s completely melted.
4. Troubleshooting Common Issues:
– Seizing: If you notice your chocolate clumping and becoming grainy, it may have seized. This can happen if even a drop of water gets into the chocolate. If this happens, try adding a teaspoon of vegetable oil or coconut oil and stir vigorously to restore smoothness.
– Burning: Be cautious not to leave the chocolate in the microwave for too long. If it burns, it will have a bitter taste and an unpleasant texture. Always err on the side of shorter intervals and stir frequently.
Dipping the Sandwiches
Now that your chocolate is perfectly melted, it’s time to coat your banana sandwiches.
1. Prepare for Dipping: Set up a clean workspace and have your melted chocolate and banana sandwiches ready. You might also want to place parchment paper on a baking sheet for the dipped sandwiches to cool on.
2. Dipping Tools: Use a fork, skewer, or dipping tool to dip each sandwich into the melted chocolate. A fork works well as it allows excess chocolate to drip off.
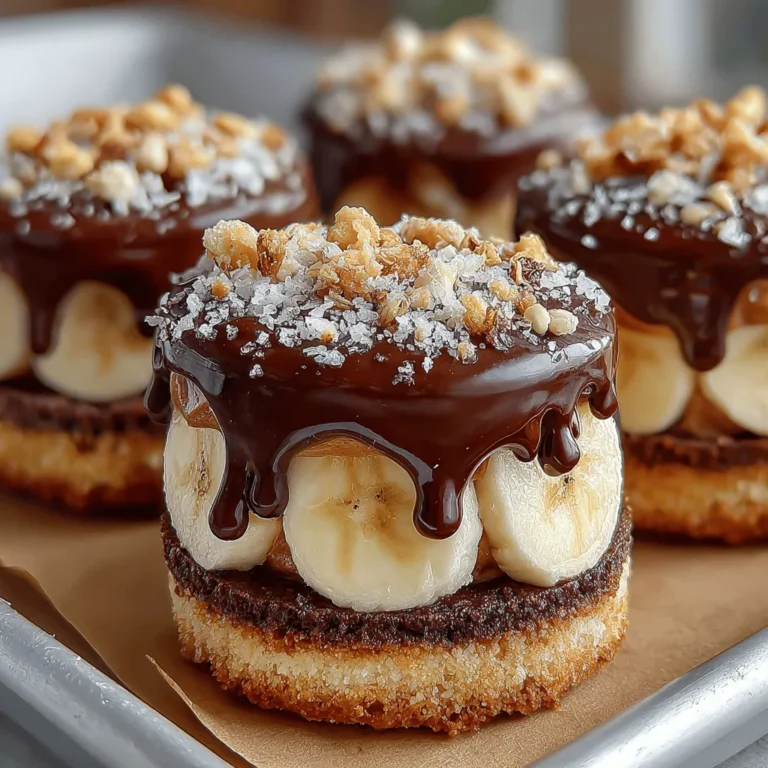
3. Achieving an Even Coating: Fully immerse the banana sandwich in the chocolate, ensuring it’s coated on all sides. Lift it out and gently tap the fork against the bowl’s edge to remove any excess chocolate. This will help achieve a thin, even layer.
4. Repeat: Continue dipping all banana sandwiches, placing them on the parchment-lined baking sheet once coated.
Enhancing with Crunch
For an added layer of flavor and texture, consider enhancing your chocolate-coated sandwiches with toppings.
1. Optional Toppings:
– Crushed Nuts: Chopped almonds, walnuts, or pecans provide a delightful crunch and pair well with chocolate and banana.
– Granola: A sprinkle of granola adds a rustic touch and a satisfying crunch, making every bite more exciting.
– Coconut Flakes: Unsweetened shredded coconut can also be a fantastic topping, giving a tropical flair to your treats.
2. How to Apply Toppings: After dipping each sandwich, immediately sprinkle your desired toppings over the chocolate before it sets. This ensures they adhere well to the coating.
Finalizing and Serving Frozen Chocolate Banana Sandwich Coins
Setting and Serving
Once all your sandwiches are coated and garnished, the next step is to let the chocolate set properly.
1. Setting the Chocolate: Place the baking sheet with the dipped sandwiches into the freezer. Allow them to set for at least 30 minutes. This will harden the chocolate, creating a delightful snap when bitten into.
2. Serving Temperature: For the best experience, serve the banana sandwich coins straight from the freezer. They will be firm yet soft enough to enjoy without the chocolate melting too quickly.
Presentation Tips
The way you present your Frozen Chocolate Banana Sandwich Coins can elevate the dessert experience.
1. Creative Plating: Arrange the coins on a decorative platter. You could even use a tiered serving stand for an elegant touch at gatherings.
2. Garnishing: Consider dusting the platter with cocoa powder or a sprinkle of crushed nuts for an eye-catching presentation. Fresh mint leaves can also add a pop of color and freshness.
3. Individual Servings: For a more personalized touch, serve each sandwich coin on individual dessert plates with a small scoop of whipped cream or yogurt on the side.
Nutritional Benefits of Frozen Chocolate Banana Sandwich Coins
Highlighting Health Benefits
One of the appealing aspects of the Frozen Chocolate Banana Sandwich Coins is their nutritional profile.
1. Balanced Ingredients: This treat combines bananas, which are rich in potassium and fiber, with chocolate that contains antioxidants and healthy fats. The addition of nut butter provides protein and healthy fats, making this a wholesome snack.
2. Natural Sugars: The primary sweetness comes from the bananas, which means you’re consuming natural sugars rather than refined sugars found in many desserts. This makes them a better option for satisfying sweet cravings without the guilt.
Comparing Alternatives
When compared to traditional desserts, these Frozen Chocolate Banana Sandwich Coins stand out as a healthier choice.
1. Lower Calorie Count: Many desserts can be high in calories and sugars. In contrast, these sandwich coins are relatively low in calories while still providing satisfaction.
2. Wholesome Ingredients: Unlike store-bought treats loaded with preservatives and artificial ingredients, these are made with simple, natural components. This makes them not only a delicious option but also a nourishing one.
Conclusion: Enjoying Your Frozen Chocolate Banana Sandwich Coins
In summary, making and indulging in Frozen Chocolate Banana Sandwich Coins is a delightful experience that combines simplicity and health benefits. The process of creating these treats—from crafting the smooth chocolate coating to enhancing them with crunchy toppings—is not only satisfying but also allows for creativity in the kitchen.
These sandwich coins are perfect for various occasions, whether you’re hosting a gathering, looking for a quick snack at home, or wanting to surprise the family with a sweet yet nutritious dessert. Their balanced ingredients mean you can enjoy them without feeling guilty, making them a standout choice in the realm of desserts.
Encourage your loved ones to try this easy recipe that merges indulgence with health. By using wholesome ingredients and simple preparation techniques, you’ll create a treat that delights the taste buds while nourishing the body. So go ahead, whip up a batch of these Frozen Chocolate Banana Sandwich Coins and enjoy every delicious bite!


