Honey Crisp Apple Pie Bars: A Delicious Dessert Delight
When it comes to delightful desserts that capture the essence of fall, Honey Crisp Apple Pie Bars stand out as a favorite. These bars combine the warm, comforting flavors of cinnamon and nutmeg with the crisp sweetness of fresh Honey Crisp apples, making them an ideal choice for any gathering or simply as a treat to enjoy at home. Not only are they easy to make, but they also transform seasonal ingredients into a mouthwatering dessert that evokes nostalgia and warmth.
The beauty of Honey Crisp Apple Pie Bars lies in their versatility. Whether you’re hosting a family gathering, contributing to a potluck, or simply craving a slice of something sweet, these bars are sure to impress. Their easy-to-handle format makes them perfect for serving, allowing guests to enjoy them with minimal fuss. Moreover, their layered structure of buttery crust, spiced apple filling, and crumbly topping creates a delightful textural contrast that appeals to all ages.
Understanding the Ingredients
To create the perfect Honey Crisp Apple Pie Bars, it’s essential to understand the key ingredients that contribute to both flavor and texture. The recipe starts with a simple yet effective combination of flour, sugar, and cold butter, which comes together to form a rich, buttery crust. Using cold butter is crucial; it helps create a flaky texture that is both tender and crumbly. When the cold butter is mixed into the dry ingredients, it remains as small chunks, which, when baked, create pockets of flakiness in the crust.
Oats play a significant role in both the crust and the topping, adding a hearty texture and a subtle nutty flavor. Incorporating oats not only enhances the overall flavor profile but also gives the bars a satisfying chewiness that complements the tender apples.
Speaking of apples, the star of this dessert is undoubtedly the Honey Crisp variety. Known for their perfect balance of sweetness and tartness, Honey Crisp apples bring an unparalleled crisp texture that holds up beautifully when baked. This variety offers a refreshing bite that contrasts with the warmth of the spices, making every bite a delightful experience. Additionally, the use of lemon juice in the apple filling serves a dual purpose: it enhances the overall flavor of the apples and prevents them from browning, keeping the filling vibrant and appealing.
Step-by-Step Instructions for Perfect Apple Pie Bars
Now that we have a good understanding of the ingredients, let’s move on to the process of creating these delicious Honey Crisp Apple Pie Bars. Follow these step-by-step instructions to ensure that your bars turn out perfectly every time.
Preheating the Oven and Preparing the Baking Dish
Begin by preheating your oven to 350°F (175°C). This step is crucial as it ensures an even baking temperature, allowing the crust to become golden and the apple filling to cook thoroughly. While the oven is heating, prepare your baking dish. A 9×13-inch pan works perfectly for this recipe. To make removal easier once the bars are baked, line the pan with parchment paper, leaving some overhang on the sides. This will allow you to lift the entire batch out of the pan without hassle, ensuring neat, clean slices.
Creating the Crust and Topping
In a mixing bowl, combine flour, oats, brown sugar, and a pinch of salt. The dry ingredients form the foundation of both the crust and the topping, so it’s essential to mix them thoroughly. Next, take your cold butter and cut it into small cubes. Using a pastry cutter or your fingers, work the butter into the dry mixture until it resembles coarse crumbs. Pay attention to the texture; you want to see small pieces of butter throughout the mixture, as these will help create the desired flakiness in the crust.
Once your mixture is ready, reserve about one cup for the topping, and press the remaining mixture firmly into the bottom of the prepared baking dish. Make sure to pat it down evenly to create a solid foundation. This step is crucial for ensuring that your bars hold together well after baking.
Preparing the Apple Filling
While the crust is baking, it’s time to prepare the apple filling. Start by washing and slicing your Honey Crisp apples. Aim for thin, uniform slices to ensure even cooking. A mandoline slicer can be helpful for achieving consistent thickness, but a sharp knife will also do the job well. Once sliced, place the apples in a large mixing bowl and add lemon juice, granulated sugar, cinnamon, nutmeg, and a touch of cornstarch. The lemon juice will not only elevate the flavors but also help prevent the apples from browning while you prepare the rest of the dessert.
Gently toss the apples with the filling ingredients until they are evenly coated. This ensures that every slice of apple is infused with the warm spices and sweetness, enhancing the overall flavor of the pie bars.
With the crust baked and the apple filling ready, you are now prepared to assemble your Honey Crisp Apple Pie Bars. This initial phase sets the stage for creating a dessert that is both visually appealing and deliciously satisfying. Get ready to layer the apple filling and crumb topping, and soon you will be enjoying the delightful aromas of freshly baked apple pie bars wafting through your kitchen.
Stay tuned for the next part, where we will dive into the assembly and baking process, ensuring that your Honey Crisp Apple Pie Bars turn out perfectly every time.
{{image_2}}
Assembling the Bars
Once your crust has cooled slightly, it’s time to assemble your Honey Crisp Apple Pie Bars. Start by preheating your oven to 350°F (175°C) if you haven’t already done so.
1. Prepare the Filling: In a large mixing bowl, combine your prepared Honey Crisp apples with lemon juice, sugar, cinnamon, and nutmeg. Toss the apples until they are evenly coated. This mixture not only enhances the flavor but also ensures that the apples cook evenly.
2. Layer the Ingredients: Take your cooled crust and spread half of it into the bottom of a greased 9×13 inch baking pan. Using your fingers or a spatula, press the crust down firmly to create an even layer.
3. Distributing the Filling: Pour the apple mixture over the crust, spreading it evenly to ensure every bar has a balanced filling.
4. Adding the Topping: Take the remaining crust mixture and crumble it over the top of the apple filling. For an even distribution, use your fingers to sprinkle small clumps of the topping across the surface rather than dumping it in one spot. This technique helps prevent large clumps that can disrupt the texture of the final product.
Baking the Bars
Now that your bars are assembled, place the baking pan in the preheated oven. Bake for 30 to 35 minutes or until the topping is a lovely golden brown and the filling is bubbling.
Indicators for Proper Doneness
To ensure your Honey Crisp Apple Pie Bars are baked perfectly, watch for these signs:
– Bubbling Filling: Look for the filling to bubble around the edges, which indicates that the apples are cooking and the sugars are caramelizing.
– Golden Topping: The topping should be a rich golden brown, which signifies that the butter and sugars in the crumble mixture have melded together perfectly.
Once you see these signs, remove the bars from the oven and allow them to cool in the pan for about 15 minutes.
Cooling and Serving the Bars
Cooling is a crucial step that should not be overlooked. Allow the bars to cool completely in the pan before attempting to cut them. This cooling period ensures that the filling sets properly, making it easier to cut clean squares without the filling spilling out. If you attempt to cut them too soon, you may end up with a messy presentation.
Presentation Ideas
As the bars cool, consider how you’d like to serve them. Here are a few presentation ideas to enhance their visual appeal:
– Dust with Powdered Sugar: A light dusting of powdered sugar can add a touch of elegance and sweetness.
– Garnish with Fresh Apples: Thinly slice a few Honey Crisp apples and arrange them around the bars for a pop of color.
– Serve in Individual Portions: Cut the bars into squares or rectangles and serve them on individual dessert plates for a more refined presentation.
Flavor Profile and Texture Analysis
The taste experience of Honey Crisp Apple Pie Bars is a delightful balance between sweet and tart. Honey Crisp apples are known for their crisp texture and balanced flavor, making them an ideal choice for this recipe.
Texture Contrast
The texture of these bars is equally enticing. The crumbly topping provides a satisfying contrast to the tender, juicy apple filling. The oats in the topping add a delightful chewiness that complements the smoothness of the cooked apples, creating a truly satisfying bite.
Flavor Variations
For those wanting to experiment, consider adding a handful of chopped nuts such as pecans or walnuts into the topping for added crunch. You can also play with different spices; a pinch of cloves or a hint of cardamom can elevate the flavor profile even further.
Serving Suggestions and Pairings
These Honey Crisp Apple Pie Bars are delicious on their own, but they can also be elevated with a few simple serving suggestions:
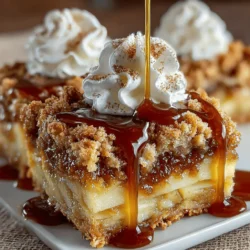
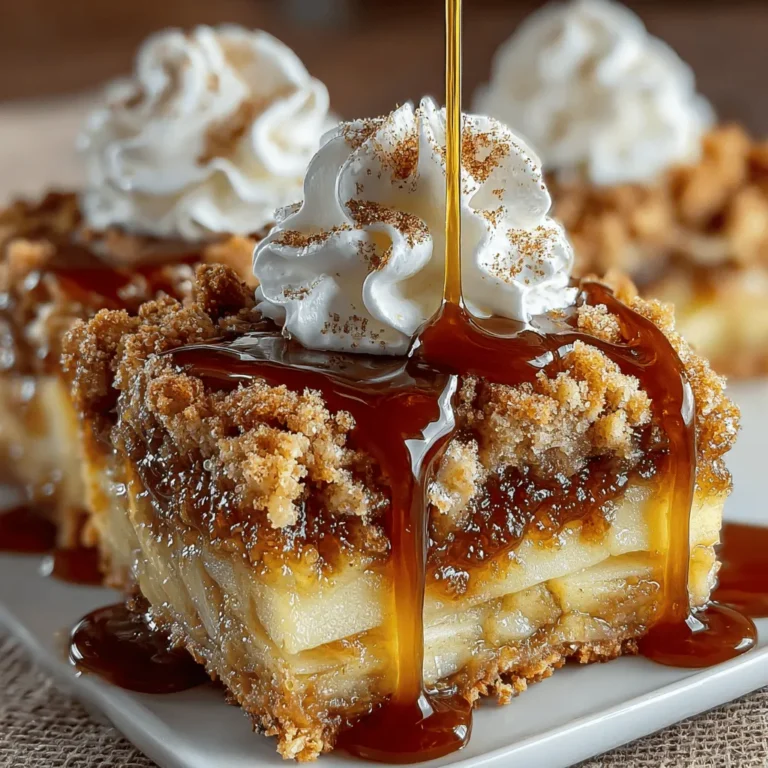
– Whipped Cream or Vanilla Ice Cream: A dollop of freshly whipped cream or a scoop of vanilla ice cream adds creaminess that beautifully complements the bars’ flavors.
– Caramel Sauce: Drizzle some warm caramel sauce over the top for an indulgent treat.
Beverage Pairings
Pair your dessert with a warm beverage to enhance the overall experience. Consider serving your bars alongside:
– Warm Cider: The spiced apple flavor of warm cider pairs perfectly with the bars.
– Coffee: A cup of freshly brewed coffee balances the sweetness of the dessert, making it an excellent choice for afternoon or evening enjoyment.
Nutritional Information
When it comes to the nutritional benefits of Honey Crisp Apple Pie Bars, there are several positives to highlight.
– Fiber Content: The oats and apples provide a good source of dietary fiber, which is essential for digestive health.
– Natural Sweetness: While there is sugar in the recipe, the natural sugars from the Honey Crisp apples help to reduce the need for additional sweeteners, allowing for a less processed dessert option.
– Consideration of Sugar Content: If you wish to reduce the sugar content further, consider using alternatives like coconut sugar, or reducing the amount of sugar in the filling without sacrificing flavor.
Conclusion
In summary, Honey Crisp Apple Pie Bars are a comforting and delicious dessert that encapsulates the essence of fall. The combination of sweet and tart flavors, along with the satisfying texture, makes these bars a perfect treat for any occasion.
We encourage you to try this recipe and experience the delightful flavors and aromas that come from baking with fresh apples. There’s a unique joy in sharing homemade treats with loved ones, whether it’s during a festive gathering or as a simple afternoon snack.
So, gather your ingredients, preheat that oven, and dive into the delightful world of baking. Your taste buds will thank you!