
Zesty Hatch Chili Pickled Cucumber Relish: A Flavorful Culinary Adventure
In the vibrant world of culinary arts, pickling stands out as a time-honored method that has captured the hearts and taste buds of people across the globe. This technique not only preserves the freshness of seasonal produce but also transforms simple ingredients into flavorful delights that tantalize the palate. One such extraordinary creation is the Zesty Hatch Chili Pickled Cucumber Relish, a dish that celebrates the crispness of cucumbers paired with the fiery zest of Hatch green chilies. This relish is more than just a condiment; it’s an experience that elevates any meal, adding a refreshing element that complements a variety of dishes.
The unique flavor profile of this relish is what makes it a standout addition to your culinary repertoire. Fresh cucumbers lend their crunchy texture, while the Hatch green chilies contribute a distinctive heat and a slightly smoky undertone. The combination is then balanced with a tangy vinegar base and a medley of spices, resulting in a condiment that is at once bright, zesty, and deeply satisfying. Whether you’re looking to enhance grilled meats, top off tacos, or simply enjoy it as a side, this relish promises to add a delightful spark to your table.
The Allure of Pickling: A Culinary Tradition
Pickling is more than just a cooking technique; it is a culinary tradition steeped in history and cultural significance. This method of preservation dates back thousands of years and has been utilized across various cuisines worldwide. From the sweet and sour pickles of Eastern Europe to the spicy kimchi of Korea, the art of pickling is as diverse as the cultures that practice it.
The benefits of pickling extend beyond mere preservation. It allows for the extension of shelf life, enabling seasonal fruits and vegetables to be enjoyed year-round. Furthermore, the process of fermentation that often accompanies pickling can enhance the nutritional profile of foods, introducing beneficial probiotics that support gut health. In addition to its practical advantages, pickling also serves as a creative outlet, encouraging home cooks to experiment with flavors and combinations that reflect their personal tastes.
Understanding the Key Ingredients
A successful Zesty Hatch Chili Pickled Cucumber Relish hinges on the quality and selection of its ingredients. Each component plays a crucial role in crafting the final flavor and texture of the relish.
– Cucumbers: The cornerstone of any pickle, cucumbers provide the necessary crunch and freshness. For this relish, the best choices are typically English cucumbers or Kirby cucumbers. Both varieties have a firm texture and a thin skin, making them ideal for pickling. Their mild flavor allows the other ingredients to shine while providing a satisfying crunch in every bite.
– Hatch Green Chilies: Originating from the Hatch Valley in New Mexico, Hatch green chilies are beloved for their distinct flavor profile. They range in heat from mild to medium, with a slightly sweet and smoky taste. Roasting these chilies enhances their natural sweetness and adds complexity to the relish, making each spoonful a delightful experience.
– Apple Cider Vinegar: This tangy vinegar is a pivotal ingredient in the pickling process. It not only adds acidity, which is essential for preserving the cucumbers, but also imparts a rich, fruity flavor that balances the heat of the chilies. Apple cider vinegar is also celebrated for its health benefits, including potential digestive support and antioxidant properties.
– Spices and Seasonings: A blend of spices such as mustard seeds, coriander seeds, and garlic is integral to the relish’s depth of flavor. Mustard seeds lend a subtle warmth and crunch, while coriander seeds add a hint of citrusy brightness. Garlic infuses the relish with aromatic richness, creating a well-rounded condiment that enhances the overall taste.
Step-by-Step Guide to Making Zesty Hatch Chili Pickled Cucumber Relish
Now that we’ve explored the captivating world of pickling and the essential ingredients that make this relish special, it’s time to dive into the preparation process. Making your own Zesty Hatch Chili Pickled Cucumber Relish is straightforward and rewarding, allowing you to customize the flavors to your liking. Here’s a comprehensive step-by-step guide to get you started on your pickling adventure:
Step 1: Gather Your Ingredients
Start by assembling all the necessary ingredients. For this recipe, you will need:
– Fresh cucumbers (preferably English or Kirby)
– Hatch green chilies (fresh or roasted)
– Apple cider vinegar
– Water
– Sugar
– Salt
– Mustard seeds
– Coriander seeds
– Garlic cloves
– Optional: additional spices like black peppercorns or dill for extra flavor
Step 2: Prepare the Cucumbers
Wash the cucumbers thoroughly under cold water. Depending on your preference, you can slice them into rounds, spears, or even leave them whole if using smaller varieties. If you choose to slice, aim for uniform pieces to ensure even pickling.
Step 3: Roast the Hatch Green Chilies
If using fresh Hatch green chilies, roasting them will elevate their flavor. Preheat your oven or grill to medium-high heat. Place the chilies directly on the grill or on a baking sheet in the oven. Roast them until the skin is blistered and charred, turning occasionally to achieve even roasting. Once done, remove them from the heat and place them in a bowl covered with plastic wrap for about 10 minutes. This steaming process will make it easier to peel off the skin. Once cooled, peel off the charred skin, remove the seeds, and chop the chilies into small pieces.
Step 4: Make the Pickling Brine
In a medium saucepan, combine equal parts apple cider vinegar and water. Add sugar and salt to taste, stirring until dissolved. You can adjust the quantities based on your preference for sweetness and saltiness. To this mixture, add the mustard seeds, coriander seeds, and garlic cloves. Bring the mixture to a gentle boil, then reduce the heat and let it simmer for a few minutes to allow the flavors to meld.
Step 5: Combine Ingredients in a Jar
In a clean, sterilized jar, layer the sliced cucumbers and chopped Hatch green chilies. Pour the hot pickling brine over the top, ensuring that all the cucumbers are submerged. If desired, you can add additional spices or herbs at this stage for an extra flavor boost.
Step 6: Cool and Refrigerate
Allow the jar to cool to room temperature before sealing it with a lid. Once cooled, refrigerate the relish for at least 24 hours to allow the flavors to develop. However, for optimal taste, letting it sit for a few days will deepen the flavors even further.
As you embark on this pickling journey, you’ll discover not only the joy of creating your own condiments but also the countless ways to integrate this Zesty Hatch Chili Pickled Cucumber Relish into your meals. Whether served alongside grilled meats, as a topping for sandwiches, or simply enjoyed on its own, this relish promises to bring a burst of flavor to every bite.
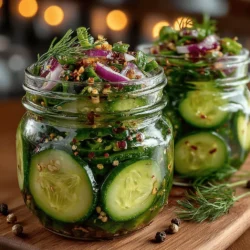
{{image_2}}
Preparing the Ingredients
To craft the perfect Zesty Hatch Chili Pickled Cucumber Relish, it’s essential to start with the freshest ingredients. Here’s how to prepare them:
Slicing Cucumbers
Begin by selecting firm, unwaxed cucumbers, as they tend to hold up better during the pickling process. Rinse them thoroughly under cold water to remove any dirt or pesticides. Using a sharp knife or a mandoline, slice the cucumbers into thin rounds—about ¼ inch thick. For a more unique texture, you can also opt for half-moons or spears, depending on your preference.
Chopping Onions
Next, peel and chop a medium onion. You can choose between red or yellow onions; both add a distinct flavor but will impart slightly different tastes. Aim for small, uniform pieces to ensure even distribution throughout the relish. This will allow the onion’s sweetness to meld beautifully with the cucumbers and chilies.
Roasting and Peeling Hatch Chilies
Hatch chilies, known for their robust flavor and varying heat levels, are the star of this relish. Preheat your oven to 450°F (232°C). Place the chilies on a baking sheet lined with parchment paper and roast them for about 10-15 minutes, turning occasionally, until their skins become blistered and charred. Once roasted, transfer the chilies to a bowl and cover it with plastic wrap or a kitchen towel. This steaming process will make peeling easier. After about 10 minutes, peel off the charred skin, remove the stems and seeds, and chop the chilies into small pieces. Be cautious—if you prefer a milder flavor, ensure you remove all seeds, as they contain much of the heat.
Combining the Vegetables
Now that your cucumbers, onions, and Hatch chilies are prepared, it’s time to combine them. In a large mixing bowl, gently toss the sliced cucumbers, chopped onions, and chilies together. The goal here is to evenly distribute the ingredients, allowing the flavors to meld seamlessly. This step is crucial, as it ensures that every bite of relish delivers a balanced taste of sweet, tangy, and spicy.
Preparing the Brine
The brine is the heart of your relish, imparting essential flavor and preserving the vegetables. In a saucepan, combine equal parts water and white vinegar (for a classic tang), along with granulated sugar and salt. A typical ratio is 1 cup of water, 1 cup of vinegar, ½ cup of sugar, and 1 tablespoon of salt. Heat the mixture over medium heat until the sugar and salt dissolve completely.
Tips for Achieving a Balanced Flavor
To enhance the flavor of your brine, consider adding whole spices such as mustard seeds, coriander seeds, or black peppercorns. You can also include a pinch of red pepper flakes if you desire additional heat. Taste the brine before adding it to the vegetables; it should strike a balance between sweet and tangy, with a savory undertone. Adjust the sugar or vinegar to suit your palate.
Combining Vegetables with Brine
Once your brine is ready, allow it to cool slightly before pouring it over the vegetable mixture. This step avoids cooking the vegetables, which can lead to a soggy texture. Pour the warm brine over the cucumbers, onions, and chilies in the mixing bowl, ensuring that they are fully submerged. Stir gently to combine, allowing the vegetables to soak in the brine. This soaking period is crucial for flavor absorption; ideally, let the mixture sit for at least 30 minutes before transferring it to jars.
Packing and Refrigerating
Sterilizing your jars is vital for maintaining the freshness of your relish. To sterilize, wash the jars and lids in hot, soapy water, then place them in a preheated oven at 225°F (107°C) for about 15 minutes. Carefully remove the jars from the oven, and while they’re still hot, pack the vegetable mixture tightly into each jar, leaving about ½ inch of headspace at the top.
Pour any remaining brine over the vegetables to ensure they are completely submerged. Seal the jars with sterilized lids, then allow them to cool to room temperature. Once cooled, refrigerate the jars. The relish will taste best after it has marinated for at least 24 hours, but it can be enjoyed immediately if you’re eager to dive in.
Serving Suggestions
Zesty Hatch Chili Pickled Cucumber Relish is incredibly versatile. Here are some delicious ways to enjoy it:
– As a Condiment: Use the relish as a zesty topping for grilled meats, tacos, or burgers. It adds a refreshing crunch and a spicy kick that enhances the overall flavor of your dish.
– In Salads: Mix the relish into green salads or grain salads for a burst of flavor. It pairs particularly well with quinoa, black beans, and avocado.
– With Cheese: Serve the relish alongside cheese platters. The acidity and heat of the relish balance perfectly with creamy cheeses like goat cheese or sharp cheddar.
– On Sandwiches: Add a spoonful of relish to sandwiches or wraps for an unexpected twist that elevates the entire meal.
The Flavor Profile: What to Expect
The beauty of Zesty Hatch Chili Pickled Cucumber Relish lies in its complex flavor profile. The sweetness from the sugar contrasts beautifully with the acidity of the vinegar, creating a balanced taste. The Hatch chilies add a rich, smoky heat that can vary from mild to spicy, depending on the variety and preparation. Meanwhile, the crispness of the cucumbers brings a refreshing quality, making this relish a delightful addition to any dish.
This relish complements a variety of meals, from grilled meats to vegetarian dishes. Its bright, zesty flavors can elevate simple meals, making it a must-have condiment in your kitchen.
Storage and Shelf Life
For optimal freshness, store your Zesty Hatch Chili Pickled Cucumber Relish in the refrigerator. In a properly sealed jar, it can last for about 2-3 weeks. However, for the best flavor and texture, aim to consume it within the first week after preparation. As time goes on, the vegetables may soften and lose their crispness, but the flavors will continue to meld and develop.
Always check for signs of spoilage before consuming, such as off odors or unusual colors. If the relish begins to lose its vibrant color or develops an off smell, it’s best to discard it.
Conclusion
Making Zesty Hatch Chili Pickled Cucumber Relish is not just a cooking endeavor; it’s an exploration of flavors that enhances any meal. The combination of crunchy cucumbers, sweet onions, and spicy Hatch chilies creates a condiment that is as versatile as it is delicious.
Whether you’re looking to spice up a sandwich, add zest to grilled meats, or enjoy a tangy burst in salads, this relish will not disappoint. As you dive into the world of pickling, feel free to experiment with different vegetables and spices, allowing your creativity to guide you. Embrace the joy of preserving and discover how simple ingredients can transform into something extraordinary. Happy pickling!